How to install your DriveVision 4K dash camUpdated 5 months ago
Installation Video:
User Manual:
Step 1: Insert the microSD card
Before mounting your dash cam, insert the included microSD card into the slot on the right-hand side of the device. The card should click into place when fully inserted. If you need to remove it later, simply push it in again, and it will pop out.
Make sure the logo side of the microSD card is facing the buttons on the dash cam, with the blank side facing the lens.
Step 2: Choose the installation spot
Select a position on your windscreen that does not obstruct your view but still provides a clear recording angle. Consider the cable routing to ensure it reaches both the dash cam and the power source without interfering with airbags or visibility.
Step 3: Decide whether to use the electrostatic film
You have the option to mount your dash cam using the electrostatic film or attach it directly to the windscreen.
Advantages of using the electrostatic film:
Easier removal: If you ever need to reposition the mount, it won’t leave adhesive residue.
Stronger adhesion: Provides a clean, dust-free surface for a firm grip.
Protects your windscreen: Prevents potential adhesive marks.
To apply the electrostatic film:
Clean the selected area of the windscreen with a microfiber cloth to remove dust and debris.
Peel the backing away from the text side of the film.
Apply the clear side to the windscreen.
⚠️ Note: Once applied, the film cannot be reused if removed, as dust will prevent it from adhering properly.
If you prefer not to use the film, you can attach the mount directly to the windscreen.
Step 4: Attach the dash cam mount
For easier installation, detach the mounting plate from the dash cam:
Hold the dash cam securely in one hand.
Gently pull the mounting plate downwards with the other hand.
Attach the mount to the electrostatic film or windscreen.
Reattach the dash cam to the mount.
Step 5: Route the power cable
Use the provided trim tool to tuck the power cable neatly along the trim and roof liner.
Common routing options:
Around the edge of the windscreen and down the A-pillar.
Under the glovebox and along the center console.
Avoid airbag deployment areas, especially in the A-pillar.
Step 6: Connect the power source
Using the USB-C car adapter
Plug the adapter into your vehicle’s 12V socket.
Using the hardwire kit (for parking mode)
- Insert the included 2 amp fuse into one of the provided fuse taps.
📹 Refer to our installation video above for visual guidance on correct fuse placement. - Choose the correct fuse tap size for your vehicle’s fuse box:
ATC
Mini
Micro
Micro 2
Connect the fuse tap to the power cable using the crimp connector, then cover it with the protective sleeve.
Locate your vehicle’s interior fuse box.
Connect the wires as follows:
Yellow wire → Connect to a constant 12V power source (always powered).
Red wire → Connect to an ACC (ignition power) source.
Black wire → Connect to a metal ground point near the fuse box.
⚠️ Important – retaining your original vehicle fuse
If you are using a fuse tap in a slot that already has a fuse (not an empty slot), you must:
Remove the vehicle’s original fuse from the fuse box
Insert that original vehicle fuse into the fuse tap position shown in the installation image
Insert the dash cam’s 2 amp fuse into the remaining position on the fuse tap
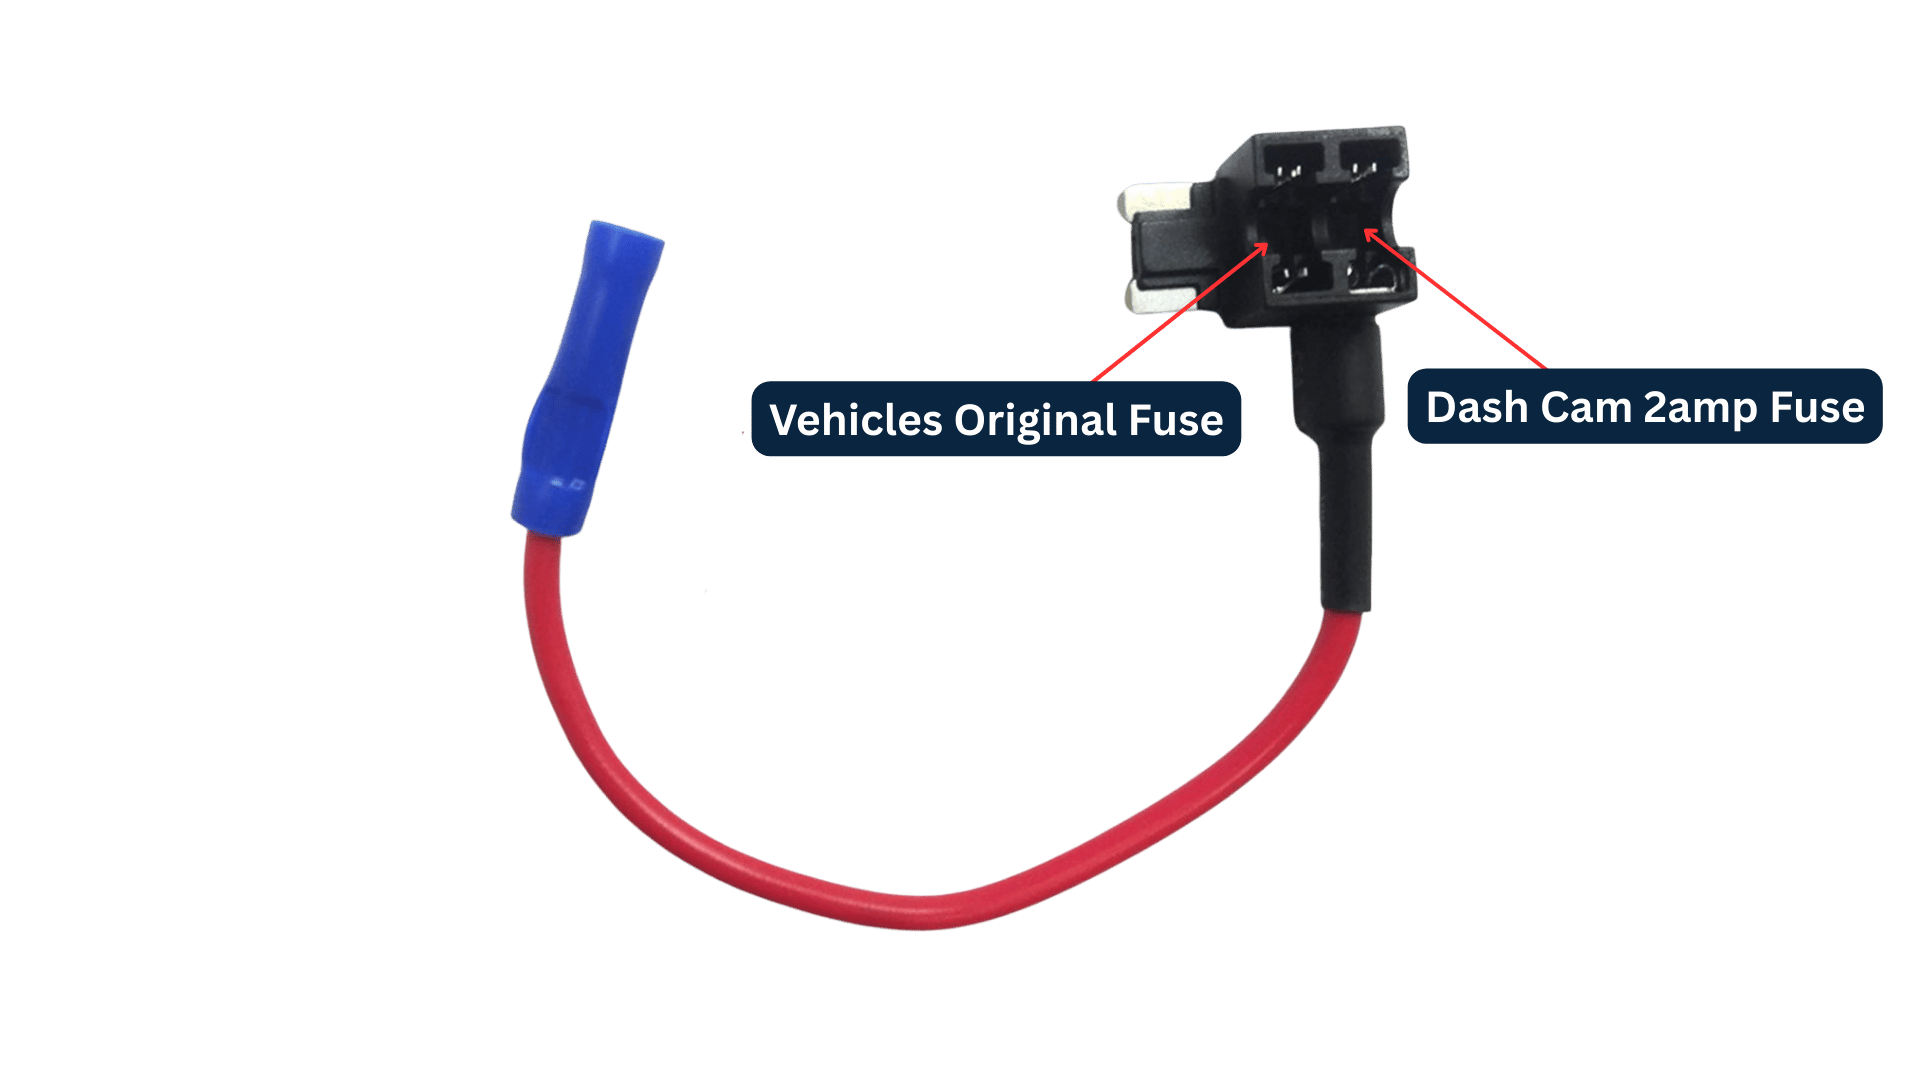
This ensures the original vehicle circuit continues to operate as normal while safely powering the dash cam.
If your vehicle’s original fuse does not physically fit into the fuse tap slot, you can purchase the same fuse rating in Mini fuse size so it will fit correctly.
⚠️ If the original vehicle fuse is removed and not reinstalled into the fuse tap, this can cause vehicle systems to stop working or create power issues.
⚠️ If you’re unfamiliar with fuse boxes or unsure which fuse to use, we recommend using the included 12V plug to power your dash cam for now and having a professional complete the hardwire installation.
⚠️ Important – choosing the correct ACC and power fuse
When selecting fuses for the hardwire kit, avoid delayed, shared, or CAN-controlled circuits, as these can cause the dash cam to behave incorrectly.
Some modern vehicles use computer-controlled power circuits that:
Stay powered briefly after the vehicle is turned off
Switch on or off with a delay
Share power with infotainment or body control systems
Provide variable or pulsed voltage instead of clean on/off power
Using these circuits can cause:
The dash cam not to start with ignition
Random shutdowns or rebooting
Parking mode not working correctly
Best practice:
Use a fuse that turns on immediately with ignition for the red ACC wire
Avoid fuses related to radios, infotainment, interior lights, USB ports, or body control modules
Use a fuse that is constantly powered for the yellow wire
If you are experiencing issues with hardwiring, and the dash cam works correctly using the supplied 12V cigarette lighter plug, this confirms the issue lies with fuse selection or hardwire installation.
Note: Some modern vehicles do not provide a clean ACC circuit in the interior fuse box. In these cases, the dash cam will still operate correctly using the supplied 12V plug, or when hardwired by a qualified installer who can source a suitable ignition signal elsewhere in the vehicle.
Step 7: Install the optional rear camera
If you purchased the rear camera, mount it on the rear windscreen following the same steps as the front camera. Ensure the cable can reach the front dash cam’s 6-pin input.
The rear camera does not require a separate power source – it is powered through the front dash cam.
Both front and rear recordings are stored on the same microSD card.
The cameras are designed for interior use only and are not weatherproof.
If the 6m cable is not long enough, you can purchase a 6m extension cable here: Rear Camera Extension Cable - 6 Metre.
Step 8: Power on and set up the dash cam
Turn on your car’s ignition. If the indicator lights start flashing, the installation is successful.
Check for the Wi-Fi signal. A flashing red light means the dash cam is emitting a Wi-Fi signal.
Connect to the dash cam’s Wi-Fi:
Step 9: Adjust camera position and settings
Use the live feed in the app to adjust the camera’s angle.
In settings, change the Loop Record Options to 3 minutes for better video management.
Change the default Wi-Fi password to prevent unauthorised access.
⚠️ Note: When parking mode is enabled, the Wi-Fi signal will turn off to save power.
If you change the Wi-Fi password, make sure to forget the old network in your phone’s Wi-Fi settings and reconnect with the new password.
Step 10 (optional): Turn on parking mode
This step is only needed if you installed your dash cam using the hardwire kit.
By default, Parking Mode is turned off and must be enabled manually in the app.
To enable:
Open the Viidure app and connect to your dash cam
Go to Camera Settings
Scroll down to Parking Mode
Set Time-lapse Video FPS to 2
Choose a Parking Monitoring Duration: 12H, 24H, or 48H
✅ If connected properly, the dash cam will automatically shut off if your car’s battery drops to 11.6V, to protect against draining it.
Need help?
For troubleshooting, visit our Help Desk: DriveVision Support or Contact Us.